Even though compressor pedals have been around since the 70s, compression is still widely a misunderstood concept by guitarists. This causes many players to dismiss its importance or simply misuse it, not enjoying its full potential.
For this reason, I wanted to, once and for all, explain to you what’s a compressor, what each of its knobs does, what it is good for, and most importantly, how to properly use a compressor pedal as a part of your rig.
Table of Contents
What Does A Compressor Do, And What is it Good For?
Contrary to common belief, a compressor pedal doesn’t lower your signal, it levels it. It does that by lowering the volume of the loud parts (or the peaks) and raising the volume of the quiet parts. Making the guitar sound more consistent throughout an entire song.
It’s useful for recording and when playing in a band where we don’t want the guitar signal to be too loud and too quiet in different sections. It’s also very useful if you’re into playing with a slide because a compressor also increases the sustain significantly.
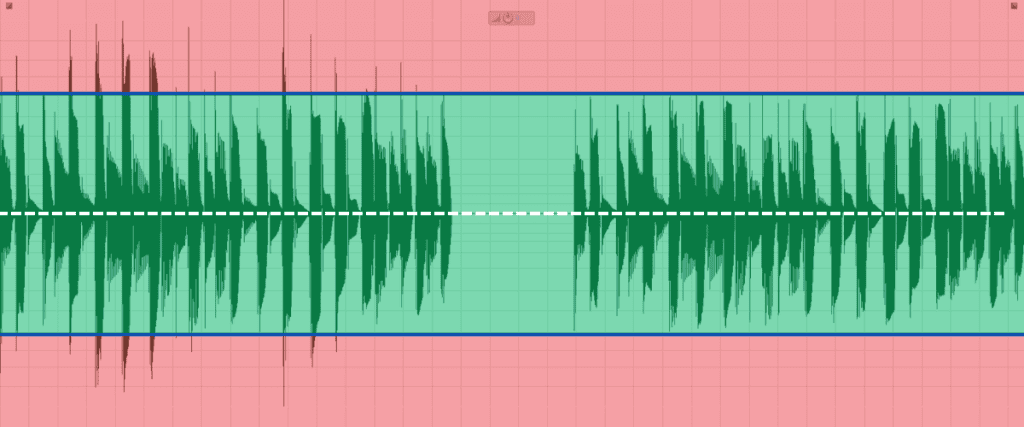
Audio Example
Here, there’s a short before/after DI recording of a clean guitar.
In the above recording, even though it may not sound like that, the second part peaks at half the volume of the first, even though they may be perceived at roughly the same volume.
Compressor Pedals Controls
Not all compressors have all of these controls. In most cases, they have some sort of “presets” of these, allowing a single knob to control many parameters of the effect.
Threshold
Different manufacturers often call the threshold by different names, such as compression, sensitivity, or sustain. It doesn’t change what it does, but it tries to simplify the jargon audio engineers use.
The threshold is the level of signal that triggers the compressor. Everything above the threshold will be affected by the compressor while leaving everything below it untouched.
For example, let’s say that I set my threshold to -5db (marked in blue). The compressor will compress all the red part above it while all the green part will remain as it was.
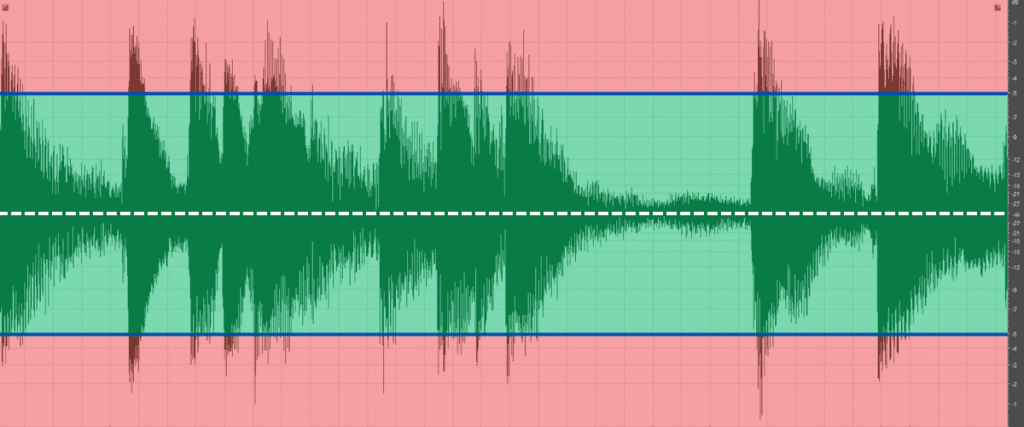
On pedals, the higher you turn the knob, the lower the threshold, and the more radical the compression would be.
Attack
The attack is the time length between the signal reaching the threshold until the compressor engages.
The higher you attack, the slower the compression. Set the attack long enough, and you can, at least theoretically, never engage the compressor, even if the entire signal is above the threshold.
Having some sort of attack is important because it allows the guitar to have some dynamic range above the threshold, or “room to breath”. In simpler terms, it makes it sound less squeezed.
Release
Release is the time between the original signal going back below the threshold (the original signal, not the compressed signal) until the compressor disengages.
The shorter the release, the more “bouncy” the signal might sound, and if it’s short enough, it might even introduce some unwanted clicks in some compressors.
Ratio
The ratio determines how much compression is applied to the signal that went over the threshold. It is represented (usually) as 1:X.
1:1 means that there’s no change to the signal as if the whole compression circuit is bypassed. 1:2 means that the signal’s volume above the threshold will be lowered by half, 1:3 will leave only a third of it, and so on.
At a certain point, the ratio stops lowering the volume by percentages and completely cuts everything above the threshold. This is called a limiter.
In theory (and most software-based compressors), the ratio can go below 1 (1:0.4, for example). A sub-1 value means that the part of the signal that goes above the threshold will become even louder. It has some use cases in sound design but very few applications when it comes to live instruments.
Gain
Gain is the simplest control of a compressor. It’s just a volume knob meant to help you boost the volume of the compressed signal to make up for the compression.
This is the part in the compressor that raises the volume of the silent part of the signal.
Blend
The blend knob lets you combine the original signal (uncompressed) with the uncompressed signal (also called parallel compression). It increases the dynamic range and makes the guitar sound less compressed.
How to Use a Compressor Pedal
Place It Properly In the Effects Chain
A compressor will compress and sustain everything that came before it on the chain, so think about what you want to be compressed and what you don’t want to.
A delay and reverb will probably fit better after the compressor in the chain, but a chorus or a flanger before a compressor can make a really cool effect.
Figure Out What You’re Looking For
Are you looking for super long, clean sustain? Do you want a strong and distinguished attack? They can all be achieved but require different settings.
Don’t Over Compress Your Signal
This is a very common mistake beginners do. Leave some dynamic range for your guitar using the attack or the blend options.
Use the Gain to Compensate for Lost Volume
You don’t have to make your guitar as loud as it used to be before you compressed it, but not compensating for the lost volume would be a mistake.
Don’t Ignore The Blend Knob
The blend knob will both add some dynamic range back and can reintroduce some lost frequencies you lost from the compression.
Beware of Too Much Gain Compensation With Slow Attack
Too slow of an attack, together with too much gain compensation, can make your amp go into a bit of an unintended overdrive.
Noteworthy Compressor Pedals
Here, I included some compressors that I think any guitar player should at least try. Some are simple, and some are a bit more complex. The more options you get, the more you can tweak their sound to fit your needs, but even the one I included with only two controls sounds fantastic out of the box.
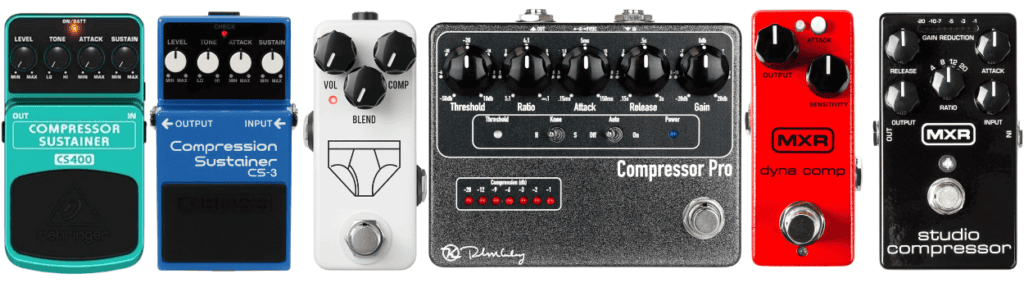
Behringer Compressor Sustainer CS400
It’s not the simplest in this list, and doesn’t built to the highest quality, but it sounds great and you can probably get any sound you want out of it. By the way, it costs $29 on Amazon. Seriously, buy it.
Boss Compressor Sustainer CS-3
This is a classic, reliable, and very popular pedal. It’s versatile enough to shine both as a subtle compressor and as a squashy country-style sustain pedal. It’s not very transparent, as it adds a lot of color to the tone, but it will most likely outlast any other gear you have. At $109 on Amazon, it’s very good value for your money.
JHS Tighty Whitey
Don’t let the goofy name fool you, this pedal is a beast. It’s not the most surgical, but it’s really all you need if you’re looking for a transparent and simple compressor that gets the work done. I’m a big fan of everything JHS, they do a wonderful work over there. It’s a bit pricey, but I wouldn’t add it if it wasn’t worth it in my opinion.
Keeley Compressor Pro
If you’re starting to get your way around compressors and want to take your precision to the next level, this is a good fit. It’s not cheap, let’s put it like that, but it sounds amazing and it allows you to shape your dynamics at a studio level quality and resolution not many other pedals can.
MXR Dynacomp
It’s simple, reliable, sounds fantastic, and has been on stages and studios for decades. Get this one if all you want is an instant tone enhancer with a vintage vibe. Not the cheapest, but worth it.
MXR Studio Compressor
I’d call this the refined version of the Dynacomp. If you like the vintage sound of the Dynacomp but need more control –this is the one. Seriously.
What’s the Difference Between a Compressor and a Sustain Pedal?
The simple truth is that both sustain and compressor pedals are different names for the same thing, but only in the context of guitar pedals.
That said, you shouldn’t confuse a sustain pedal with an infinite sustain pedal (such as this one), which is closer to a granular synth or a reverb pedal than to a compressor.
Some Tips for Using A Compressor Pedal
Always put the compressor before your overdrive, distortion, or fuzz pedals.
These gain-type effects tend to be very noisy in their own right. They have a low-volume constant hiss. As the compressor raises the volume of the quiet part of the signal, it amplifies the hiss in a very unpleasant way.
The compressor shouldn’t always be heard but felt.
A compressor isn’t always clearly audible, but it doesn’t take from its effectiveness. It can make you sound more consistent and instantly enhance your overall sound.
The compressor doesn’t just control volume. It adds color, too.
You’d be wrong to assume that a compressor doesn’t alter the signal beyond its volume. Make sure your compressor of choice fits the rest of your chain.
Finishing Thoughts
Today, we learned about the audio processing technique called compression and its applications in the context of guitars. We also learned how to use a compressor pedal, heard the effect in action, and saw some examples of recommended pedals.
I hope you enjoyed it and found what you were looking for. If not – feel free to post in the comments below, and I’ll do my best to answer.
If you enjoyed it, feel free to browse around, there are many more guitar lessons and other gear reviews. See you next time!